|
How to Draw a Tennis Racket easy with this how-to video and step-by-step drawing instructions. Easy drawing tutorial for beginners and everyone.
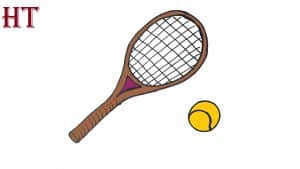
Please see the drawing tutorial in the video belowVideo produced by channel: HTDraw You can refer to the simple step-by-step drawing guide belowStep 1Start by drawing a long curved line and double it back to itself to form a teardrop-like shape. Note that the lines do not meet at the point. This forms the head and shaft or throat of the tennis racket – the part you use to hit the ball. Step 2Start drawing the handle of the racket. At the open end of the teardrop shape, draw a small curved rectangle. Then, extend a long straight line from one side of it. This begins to outline the grip. Step 3Extend another straight line, drawing out the opposite side of the grip. Connect two line segments by drawing a small trapezoid with rounded corners between them. This is called the butt of the tennis racket. Step 4Draw a large curved triangle on the racquet throat. Step 5Next, draw a large oval inside the racquet head. This distinguishes the strings from the rim. Step 6Start drawing straight lines in the rim, pointing from the racquet head to the neck and parallel to each other. These are strings. Step 7Continue drawing strings until the top of the tennis racket is full of them. Then draw the wires running horizontally. Again, use straight, parallel lines. These lines must cut the previous wires at a right angle. Step 8Continue stringing your racquet in straight lines until finished. Step 9Next, draw the tennis ball. First, let’s draw a circle. Then draw an “S” shaped line across it. Step 10Color your cartoon tennis rackets and tennis balls. Tennis rackets come in many colors, but tennis balls are usually bright yellow with a white stripe. The post How to Draw a Tennis Racket easy appeared first on How to draw step by step. Comments are closed.
|