|
Lobster Drawing easy with this how-to video and step-by-step drawing instructions. Easy animals to draw for beginners and kids.
Please see the drawing tutorial in the video below
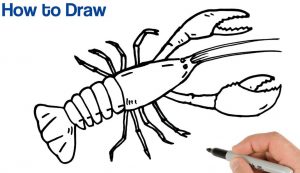
You can refer to the simple step-by-step drawing guide belowStep 1Let’s draw a lobster! For the body, draw an oval. But be careful! Make sure that the top part of your oval has a small indent in it. Also, add three circles at the bottom of your oval. Step 2In the top part of the oval, where that small indentation is, draw two dots just the right size for the lobster’s eyes. Step 3Next is the tail. At the bottom of the body, draw a small oval in the center and add two squares on either side of the small oval. Step 4For the arms, draw two small squares on either side of the body. Here’s a tip: stack the arms up high so you can make those big pliers next! Step 5Now for the pliers! Trace two large ovals at the top of the lobster’s arms, then draw two lines down the middle of each oval. Here’s a trick: draw two lines close together so the pliers look like they’re closed! Step 6Finally, you will draw the legs! Trace the four legs on either side of the lobster’s body by drawing the letter Vs upside down. Here’s a tip: create a wide V but make sure to keep your legs thin! Here you have your lobster! The post Lobster Drawing easy Step by Step appeared first on How to draw step by step. Comments are closed.
|