|
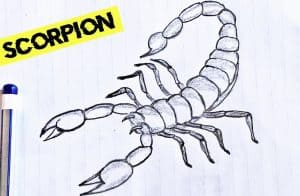
Scorpion Drawing easy with this how-to video and step-by-step drawing instructions. Insect drawing tutorial for beginners and kids.
Please see the drawing tutorial in the video below
You can refer to the simple step-by-step drawing guide belowStep 1At first, draw a circle as a guide for the scorpion’s head. Step 2Now, using a long curved line draw the spine, extending to the tail. Outline the sting at the tip of the tail. Step 3Outline the instructions for the limbs of the scorpion. Step 4Outline the powerful pincers of the scorpion. Please note that one pincer looks bigger than the other, because it’s closer. Step 5Cover the body of the scorpion using rectangular elastic panels like in our example. Step 6Add volume to the limbs of the scorpion as shown in the example below. Step 7The general shapes are ready. Erase the guide lines from the head and circle the lines to create the head and fangs array. Step 8Remove the principles from the pincer. Circle the lines of the pins to make them smooth and clean. Step 9Erase the body and tail of the guide, and as in the previous steps, make the lines smooth and clean. Step 10Thus, we have reached the final step in the lesson on how to draw a scorpion, where we need to erase the guides from the limbs and circle the lines. We hope that HTDraw.com ‘s team helped you learn how to draw a scorpion. The post Scorpion Drawing easy Step by Step appeared first on How to draw step by step. Comments are closed.
|